Whether you are building a single GPU test box or an 8+ GPU monster, building out your cracking rig has the same set of basic requirements. Instead of one enormous article, I've decided to organize the build-out into two phases:
- Hardware planning
- Software Installation
This article will deal with the first phase, with a follow-up article to come later.
There are too many ways to build hardware for a cracking rig, so I won't try to enumerate everything here. Instead, I will give guidelines and recommendations to consider when putting your rig together. In the end, I'll finish it up with a quick tutorial on installing the software.
Hardware Planning
The most important aspects of a build-out that I will detail here are:
- Power
- Cooling
- Space
- Risers
- GPUs
- Cleanup/Organization
Each component affects the rig as a whole (and by proxy all other components.) Planning ahead will save you a lot of headaches down the road, especially if you intend on scaling your rig.
Power
Most people understand that there will be power requirements, but many fail to realize what that means. You must always check the specs of your cards before you try to build anything. In most rigs, you will need to power the motherboard, system fans, hard disk drives, and your GPUs (at a minimum). You want to calculate the maximum amount of power you will need to support these components, and if possible add a little bit of headroom to the total. The last thing you want is to be unable to supply sufficient amperage to your rig when it spikes in workload; that's the fastest way to starting a fire (short of using cheap and poorly manufactured hardware.)
Let's take an example here: an AMD R9 290X reference card will use ~295 watts peak load. If you plan to run 4 GPUs in a single box, you will need a power supply unit capable of supplying at least 1180 watts for the cards alone. Now consider that you still need to power the motherboard, fans, and storage devices at a minimum, and you really want to have a 1600 watt PSU to be able to properly power this configuration.
Lesser known is the concept of PSU efficiency. The efficiency rating is how much power a PSU needs to draw from the wall to provide a particular wattage. PSUs do not have a linear curve of power consumption to efficiency, and there is a slight peak for optimal efficiency. There are quite a few people who get hung up on the concept of complete optimal efficiency, but from an practical standpoint I don't think it really matters unless you are making a super-massive cluster. For the average rig, if you are using a high end PSU, the efficiency deviation may be 1-2%. On slightly more common PSUs, maybe you are 4-6%. If you end up using this extra amp (or less) you probably won't even notice it.
A lot of people will stop here, but you also need to be aware of constraints on your motherboard. Even if your motherboard has 4 PCIe slots available, it doesn't mean the board is capable of supplying sufficient amperage to 4 cards at peak load across all slots. Don't make your goal cutting corners to save a few bucks. If you are serious about building a reliable rig, spend the money you need to make it work. This will minimize headaches later. A good option is to buy a gaming motherboard. You will spend 2-3 times more than your regular off-the-shelf board, but you're pretty much guaranteed to get a board that can keep up with the demand. As always, just remember to check the specs before you buy.
Cooling
A paramount concern will be how to cool your gear. This single decision will shape much of the direction you will need to head when building your rig. You absolutely need to answer your cooling concerns before you can proceed with any practical build-out.
- What will the climate of your location be like throughout the year?
- What's the altitude and ventilation like where you plan to host your gear?
- How much space will be between your GPUs?
- How many fans will be near the GPUs?
- How much air conditioning will be needed to regulate room temperature in this environment?
- How much airflow will you need to facilitate all of your hardware?
Climate will effect how much air conditioning you will need (obviously you would use less air conditioning in places like Alaska, Canada, and Russia then you would in Texas, Mexico, and South Africa.)
Spacing between your video cards can also greatly affect temperature. By spacing your cards an extra 3 cm or so apart, you can lower your average running temperature by as much as 8-10 C.
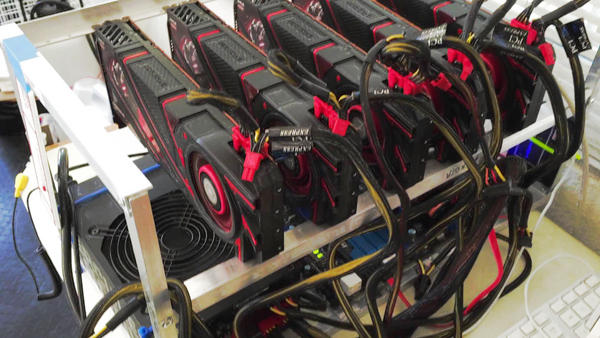
There are some people who opt to go the liquid cooling route, but these days it doesn't seem to be a very cost-effective solution considering the availability of open air cooling with GPUs. A lot can be done with some decent air conditioning, well spaced cards, and a few fans. And since we are on the topic of fans, it should be noted that you are really going to want to prefer reference video card models when building your rig- I can't really stress this point enough. You may see modified, "advanced", GPU models where the manufacturers make bold claims like: "Better Cooling! We use more fans!", but don't be fooled. Just because they have two fans on a video card instead of one doesn't mean it will cool better. A lot of times, the types of fans they use in these non-reference cards are actually cheaper, and change the direction of airflow. Both of these things are bad for GPU clusters. When a single of these cards is being used in a gaming machine it may stay cool well enough, but try stacking them in your rig and now you are just blowing a lot of hot air onto other cards and improperly dissipating heat. Save yourself a lot of trouble. Buy reference designs.
The last big factor with cooling I want to mention depends on your enclosure. There are various chassis and open-air frames you can use for your rig. Open-air rigs generally run cooler, although, with the right ventilation running, your GPUs in a well designed chassis is not a problem. Also note that most open-air frames will require the use of risers in order to work (more on this later.)
Space
Once you know how much power you will need to supply, you can figure out how much hardware is needed to make this work. This is going to be crucial when planning for your chassis or case. It may seem a bit obvious, but if you need two power supplies instead of one, it will need a case that can fit both PSUs and their associated cables. Unfortunately, I've seen too many people building out rigs in cases that aren't meant to facilitate more than a single PSU, and this simply won't scale. Once they realize they can't finish building out the six card rig they were dreaming of, they need to tear everything down, buy new gear, and start over. If you only need one or two GPUs you will be fine, but if you desire to scale out your rig then plan ahead. (This saves time and money in the long-run.)
Have you added up your hardware requirements yet?
- PSUs
- motherboard
- storage drives
- GPUs
- risers
- fans
- peripherals (keep this to a minimum)
If you have multiple GPUs, you may end up having multiple PSUs as a result. You will probably want to get a bridge or jumper switch to be able to power-on the supplemental PSUs on demand. (For the low cost of jumper switches, it's worth just buying a few of these. You can seriously get them for around $2 USD online. They are easier to turn on and off than bridging, but the hassle is whatever you are willing to put-up with.) If you do use a jumper switch, plan for its placement in your enclosure.
Make sure you get the specs for whatever enclosure you decide to use. If you are using a gaming motherboard, for example, they can sometimes run 3 cm or so (let's call it just over an inch for those of use still using the imperial system) passed your standard ATX motherboard. Some enclosures may not have taken this into consideration, so you will want to check beforehand. (It's not always the end of the world if your board is too long, but you'd rather avoid the hassle of drilling/moving holes to fit your board when you are purchasing frames rather than building them yourself.)
Risers
Using risers in your rig seems to be a bit of a taboo in this scene. It's not completely unjustified to feel this way, but if you know what you are doing and still desire to use them, risers can absolutely work. However, please keep in mind that you will take a slight performance hit when using risers. Depending on your goals, this may be an acceptable penalty, but if you are looking for absolute maximum performance then don't use risers.
That being said, if you are going to use risers, make sure you choose risers of good quality. Most of these really cheap risers you see are going to be built poorly: the cables may not be insulated correctly, the solder isn't applied correctly, the wires in your ribbon may be loose, etc. You want to avoid all of these things. If your riser is bad, it can cause an ASIC hang in your GPU, which can break your entire rig (and stop you from actually cracking hashes.) Quality risers aren't that much more expensive than the cheap ones ($9 USD vs $4 USD, for example.) But in the end, the cheap risers usually end up costing you more anyway (especially if they start a fire, which has been noted to have happened in some instances.)
I've actually had some really good experience with USB3-based PCIe risers. These will actually use USB3 to bridge your riser connectors and slots. They don't suffer from the same manufacturing defects that ribbons can often have, which is a win for you. (For clarification, these are using USB3 to bridge PCIe slots and connectors, not connecting PCIe to a machine via the USB bus.)
If you are going to use risers, here's some information you will need to remember. Your video cards are going to be connecting to PCIe. The spec itself is very particular about the impedance on the channel, and thus the timing; since PCIe is a serial technology, this becomes subtly important. The faster your PCIe bus runs, the more important this timing becomes. When you introduce risers into the mix, you alter this impedance on the channel and alter the timing. For PCIe 1.0 this is not a problem, and in most cases PCIe 2.0 should also work fairly well. PCIe 3.0 and newer, however, may decide to hate you something fierce if you use risers. (This will be especially true with USB3-based risers, as USB3 is not capable at transmitting at PCIe 3.0 bus speeds.)
Fortunately, some of the better modern BIOS you will find (like the ones on gaming motherboards) should allow you to set the speed of your PCIe bus and downgrade it to an earlier spec. This option will be specific to each BIOS, so consult your documentation for precise steps. Once you drop the speed of the bus, however, running with good quality risers should be no problem.
GPUs
Currently, there are two real options to consider when buying GPUs for a cracking rig: AMD and NVIDIA. The oft asked question here is "which one should I buy?" There can be a lot of religious wars on this topic, but there are some factual points to know.
The targeted workloads of the different cards are not the same across AMD and NVIDIA. Traditionally, NVIDIA has spent a much stronger effort on optimizing floating point operations and arithmetic while AMD put a stronger focus on integers and bitwise operations. This has lead to the commonality of NVIDIA being better for various scientific calculations and AMD being better for general cryptography. Recent changes in architectures (on both sides) have been closing that gap. Truth be told, at this point, certain algorithms work better on one and certain algorithms work better on the other. For examples of this, please refer to the following article on the hashcat forums. (Note: NVIDIA has released new drivers since that post was made which slightly increase performance and further close the gap.)
At the moment, I still recommend using AMD R9 290X because of the performance for cracking difficult algorithms. This could still change in the future, but I find AMD better for a lot of the work I still tend to do.
UPDATE: For various reasons, the winds of change have finally shifted in the GPU cracking world. As of summer 2015, I would recommend using the NVIDIA GTX 980ti for your rigs. Power consumption is far superior to AMD, and performance is really entirely comparable at this point.
For those sticking with AMD, you probably shouldn't use anything more than an R9 290X. The R9 295X has two serious issues when considering use for password cracking. First, it has a maximum temperature of 75 C, which is far lower than the 290X. This isn't quite a deal breaker by itself, depending on how cool your environment is for your cards (but it's not uncommon for many rigs to run at 80 C or higher.) Secondly, AMD's PowerTune feature will actually throttle the amperage draw for the cards, and this makes it fairly unsuitable for password cracking. Although the R9 390X hasn't been officially tested, it is supposed to have many of the same features and should thus be just as unsuitable.
Cleanup
At this point, you should have the basics for building your box. One thing I would recommend is getting zip-ties for cable management. Try to organize your cables cleanly and with a tiny bit of slack (you don't want cables stretched too taught across your rig.) Test your rig, make sure it works, and when everything looks good, shut it down and use zip-ties to keep your cables neat and in place. You can use wire cutters to cut off the excess plastic when the ties are in place. This will make your life a lot easier (and it looks better, too.)
A personal frame of reference
All considerations aside, I thought I would just give you a quick run-down on my most recent rig to give you an idea for your own.
My rig runs 4 AMD R9 290X reference cards manufactured by HiS. I use an open-air frame with USB3-based PCIe risers, an ASUS Maximus V Extreme gaming motherboard, and a 1600 watt PSU. I also use two SSDs for storage (which both require less energy and are faster than spinning disk.) I also installed 32GB of RAM for various manipulations to lists I may want to play with (I often manipulate lists and rulesets that can be 3-5 GB, though sometimes more.)
This is by no means a definitive method for building a rig, but it's one that has worked for me.
And it's worth mentioning, for those of you who don't want to put in the effort of building your own rig and have some cash to spare, Sagitta HPC offers some nice turn-key HPC cluster systems specifically for password cracking.
Stay tuned
Hopefully this will help you get going on the road to building your own rig. With just a little bit of planning, you can easily put together a powerful rig capable of laying waste to millions of real-world password hashes.
Part 2 of this article will cover installing the software for your rig (OS, drivers, and oclhashcat).
